All of which is why your fan runs fast and loud. Here are some crucial, easy steps you can take (right now!) to silence your laptop’s fans, maximize your speed/performance, and ensure your laptop lasts for a few more years.
1. Check yo’ temp
Before we do anything involving taking apart your rig/system, even before going to town with a can of compressed air, It is essential that you download a program that monitors your heat levels. Why? There’s no way of knowing if your heat temperatures (unless your laptop’s bios mention it) have increased if you don’t know what those temperatures are in the first place. A handy app that does just that is called RealTemp. It keeps track of your processors’ temps–no muss, no fuss. It monitors these temps in real time and lets you see these numbers in your tray. Record them and keep them close. It is also important to know the system’s hardware and performance. On a PC, press CTRL+ALT+DEL, then click “task manager” and move to “performance tab” to see the resources (processor, ram, storage) your laptop is using. Are they touching the top bar, 100% usage? If so, your laptop needs some treatment and hardware/software upgrades. Before moving ahead with upgrades (RAM, storage, etc), it is important to know your system’s hardware specifications.
Processor (CPU)? Memory (RAM)? DDDR 2/3/4? RAM’s frequency? Storage (HDD, SDD) is installed?
You can use a wonderful free app called CPU-Z, which will tell you all about your laptop’s hardware. A small yet precise app.
2. Defrag!
When was the last time you defragged your laptop? If you have Windows 8 and 8.1, it’s done for you automatically. If you don’t know what defragging does, it’s sort of a digital “cleanse through” of your entire system. Clearing away the cobwebs, so to speak. A lot of times the files you delete, switch around to new folders, and change the names of leave little traces of “original versions” behind. These bits and bobs of left-behind traces add up over time. Understand it like this. You have a 250 GB storage and it’s filled up to 200 GB. These used spaces are not lined properly in rows and columns but are scattered throughout the hard disk, which takes a longer time to access the file. When defragged, these used spaces get in-line (in rows & columns) so the system can now quickly access it as they are placed at the proper place for the system to access. I have been defragging since Windows 98, XP & 7. Luckily, with Windows 10, I didn’t need to as it’s fast as the cheetah. That’s how fast it is. Defragging your system once a month or so (if it isn’t set to automatic) removes these little traces and gives your system’s HDD/RAM a swift kick in the pants with a brand new “refresh.”
3. Take apart the rig
Now that we’ve determined temp levels & defragged the system, it’s time to crack open your rig. Depending on your brand, manufacturer, version it’s best to look online for directions on opening up your precious. Overall, though, most people will be doing the same thing: screwing the back/bottom and removing the protective cover. Once we’re inside, it’s time to take a can of compressed air and go to town. It’s best to burst a spray or two of air, rather than one long continuous stream of air, as it’s safer on your mechanical instruments (which can actually be ruined under long streams of air, which eventually liquidize and “melt” your components). Now, this next part is important: Go to YouTube with your laptop’s make and model, and research “how to open laptop-model-no”. I cannot stress the importance of this because everyone’s models are important. I have an Acer Aspire 5745G laptop. The components and placement of hardware are drastically different from someone who has an Acer V7. Everyone’s rigs are different. However, the dust bunnies and collections of gunk, dust, and what-not will generally be the same. No matter your setup, eliminate that pestering dust with a quick spray of your canned air. If you need to use a brush, do it but carefully.
4. Clean inside-out
Did you know that, according to a 2002 report, some toilets are cleaner than keyboards? I also heard one time that telephones were dirtier than toilets. Gross. How much bacteria, grime, and dirt lurks on your fingertips each and every day? Just imagine all those dirty dust-mites and dead skin-cells smeared over your keyboard and mouse. How many microscopic bugs are we crushing on a daily basis as they scurry across our keyboard? A truly important question is this: how often do we put our fingers near our mouth? So. Keeping a clean keyboard is important for your health, right? Once the laptop base (top & bottom) is out, it is now wise to depart each part (tip: take pictures and/or videos, so you don’t forget which part was where) and clean it properly with a brush and coffee filter. Make your baby as new as when it was shipped. This also has psychological benefits: having a cleaner “station” helps me feel more professional and in control of my choices. Is there a downside to feeling more professional? I don’t think so.
5. Apply thermal paste to CPU
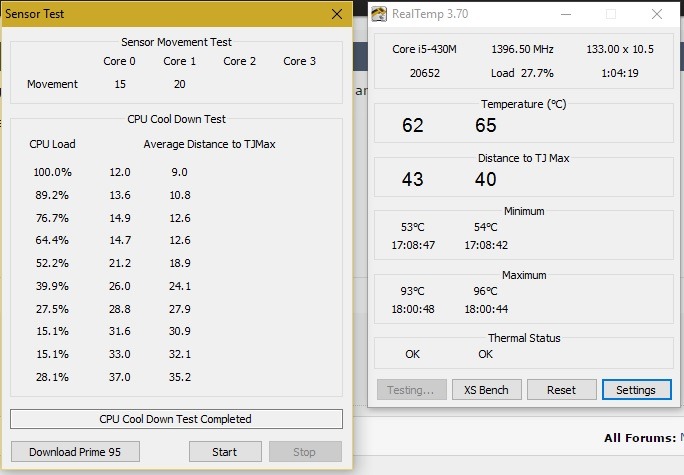
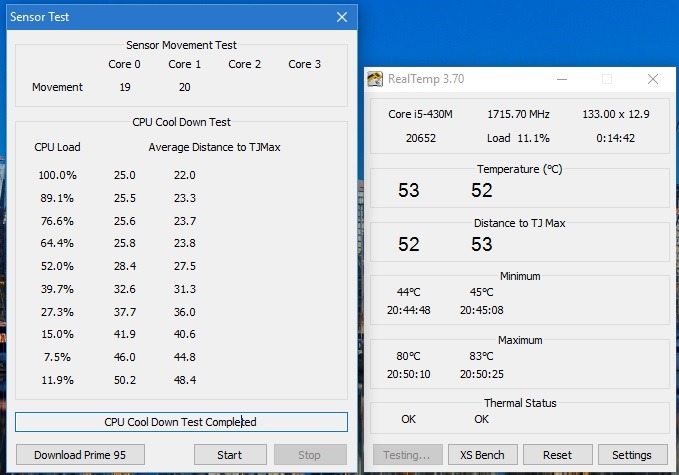
For those who don’t know, thermal paste is ESSENTIAL towards maintaining and cooling the CPU. “Platinum” thermal pastes like Artic Silver 5 can keep your CPU processor a nice 0-20 degrees cooler. Yes, 0-20 degrees does make a difference–especially when you’re gaming, rendering graphics, using software like Photoshop and AutoCAD. Without thermal paste, your CPU will overheat. It’s as simple as that. And, when it gets overheated, the fan will become louder, performance will get slow and the computer will start to lag & hang. If you want to see a step-by-step guide to applying thermal paste, check out this helpful video. Here’s the before and after thermal paste snapshot (test is done via Prime95 small FFTs & RealTemp) for my 6-year-old Acer Aspire 5745G laptop having intel i5-430m processor.
Before (thermal paste change & cleaning)
After (thermal paste change & cleaning)
See the difference? That’s a noticeable 10 degrees’ decrease (lower is better) and distance to TJMax has increased (higher is better) a lot. Hear the difference? Earlier it sounded like an old-truck-engine but now it’s smooth like the jaguar. Thankfully, I can now hear sound from my laptop’s audio. It feels as the fan noise has reduced to almost half, just like the old days.
6. Add a SSD disk
It’s a fact that SSDs have been “obliterating” HDDs for the past few years. SSDs are better than HDDs. That’s fact. Most of the laptop can handle SSD installation unless it is more than a decade old. The only requirement, I believe, is the connectors on the motherboard should match with connectors of SSD. To see for yourself just which SSD has consistently outranked them, the Samsung 850 EVO (that’s the one I replaced HDD with on my Acer 5745G laptop) has been #1 for a number of years. Twelve thousand reviews can’t be wrong. I never thought that SSD would make such a huge difference in speed and fan noise. I cannot think of using HDD now, not even for servers and hosting. I have never been happier with this little change. And, I am also hoping for a tech-future where we can shift between laptop/computer like we do with smartphones, with all data in the cloud.
7. Upgrade OS
It may sound untrue to many but after upgrading from Windows 7 to a completely fresh installation of Windows 10 has done wonders for my Acer Aspire 5745G. The start, hibernate, shutdown, opening/closing of files/documents have become insanely fast now. This could be because I upgraded Aspire 5745G’s RAM from 4GB to 8GB, replaced HDD with SDD, changed thermal paste of processor and graphic card, cleaned laptop inside-out. But, undoubtedly having a fresh installation of Windows 10 rather than an upgrade from Win 7 or 8 will increase the laptop speed (that’s based on experience on using these Win95, Win98, WinME, WinXP, WinVista, Win7, Win8 and finally Win10 over last 15 years). These changes drastically improved my laptop performance, speed and fan noise. I was about to drop the idea of buying a new (expensive) laptop. I can pledge that upgrading to Windows 10 was a very wise decision. It’s faster than all Windows OS (8, 7, Vista, XP, 98) that I have used to date.
Tip: Consider a desktop
I say this for one reason only: desktops let you use up to eight fans to keep your entire system cool, running smoothly, and with as few hiccups as possible when it comes to heat dissipation and dust build up. And it’s easy to clean, open and upgrade/change hardware. (Not to mention that, on the whole, desktops are much more powerful than laptops.) Generally, the common (and most effective) fan set up is:
Two intake fans in the front An exhaust fan on top An exhaust fan in back
Quite simply: fans push heat through your system. On the level, you can use whatever fan setup in your PC that you want. Just keep this in mind: heat rises. That’s why an outtake/exhaust fan (which pushes hot air OUT of your system) on the top of your desktop is a smart choice for keeping your baby’s insides fresh and cool. If you want maximum temperatures from fans, using minimum energy (and sounds)…check out Linus’ tech tips on YouTube for all your fan needs (like which fans to get, how many fans do you need, what the “best” fans are, and more!) Sure, the videos are dated, but guess what? The fans (and info) aren’t. Yes, I like desktop fans. However, for people with laptops, you can’t go wrong with laptop coolers! Laptop coolers are just that: they sit on your lap and cool your baby down. Finally, after you have done all of the above, run Prime95 (only with small FFTs) & RealTemp again. Compare the new temperature levels against the pre-clean levels. See the difference? Because everybody’s system is different, I highly suggest you browse the internet for helpful videos that will guide you step by step of the way. If you aren’t careful, the steps you take in cleaning your laptop may affect your performance for the worse. That is why I highly recommend watching videos, so you can see how other people do it and follow them step-by-step, even pausing and going back if needed. Featured photo credit: Luis Llerena via stocksnap.io

